Welcome to Murus
Murus is a front end for the OS X built-in PF packet filter.
It’s main purpose is to speed up network firewall configuration and testing, using a simple interface. Filtering rules and networking options can be set dragging and dropping icons, changing their order, and selecting check boxes. There is no need to learn code syntax or to type shell commands. Everything is managed by visual elements like buttons, collections, lists, icons, leds.
This manual describes Murus Pro features. Some of them are not available in Murus Basic and Murus Lite.

OS X Firewalls
OS X is one of the most secure computer operating systems today. It features a solid UNIX base and a lot of security features. OS X from the very beginning shipped with a pre-installed firewall named IPFW. Directly derived from other less- known operating systems like *BSD, IPFW has been the default OS X firewall from Mac OS X 10.0 to Mac OS X 10.6. Apple started changing it’s firewall policy with Mac OS X 10.5, introducing a built in application firewall, ALF, that can be configured from System Preferences Security preference pane, while IPFW can be configured only using the shell Terminal. On the other hand, Mac OS X Server featured a very simple IPFW graphic front end.
OS X 10.7 officially introduced a new network firewall, PF, and deprecated the old IPFW. Both PF and IPFW were installed but PF was the preferred choice according to OS X man pages, even if IPFW was the preferred choice for Mac OS X Server 10.7, according to Apple corporate web site.
IPFW survived until OS X 10.9, then it’s been officially removed from OS X 10.10. However IPFW is still enabled in OS 10.10 kernel, just copy /sbin/ipfw from a 10.9 Mac and it should work.
PF is a much more powerful and flexible network firewall. OS X PF implementation is derived from OpenBSD 4.3 PF, with some tweaks made by Apple. Most notably, traffic shaping is achieved using Dummynet, while ALTQ has totally been left out from OS X PF.
Currently OS X 10.10 and OS X 10.11 feature two firewalls:
ALF: application level firewall, can be easily configured using System Preferences Security panel. It allows or blocks network connections at application level.
PF: network firewall, can be configured using the shell Terminal or using a third party front end, like Murus. It allows or blocks network connections at network level, letting you build and customize a complex network infrastructure.
Both firewalls are disabled by default on a newly installed OS X system.
While ALF is quite easy to enable, and does not require a real configuration, PF does require a deep knowledge of its syntax and logic, and requires the user to manually edit configuration files. PF firewall and PF network monitoring has to be done from the command line. The average user really needs a graphic front end for PF in order to manage firewall rulesets.
Both PF and ALF firewalls can be activated simultaneously, and they will work together. Their approach to network filtering is different, and they follow different logic patterns.
The same is true for third party firewalls. Every application firewall can seamlessly work together with a network firewall. So, for example, a user can run PF network filtering using Murus and application filtering using a third party tool like Vallum or the OS X built-in ALF.
We suggest to turn off ALF and all other network- and application-firewalls when using Murus for the first times. It is easier to understand how Murus affects networking if PF is the only running firewall.
It is also mandatory to uninstall any third party PF front ends like IceFloor and PFLists BEFORE starting Murus. To correctly uninstall IceFloor and PFLists please use their in-app specific buttons, do not try to uninstall them manually.
Murus is a front end
Murus is NOT a firewall. Murus a graphic interface (“front end”) for PF. Actually, Murus is much more, because it does a lot more than simply creating configuration files. It lets the user create complex sets of rules, with advanced options like port knocking, adaptivity, accounting, notifications, and much more. The user can monitor network activity, services activity, logs activity in realtime and can interact with connections and rules.
PF ruleset can be managed at three different levels of abstraction:
1) the intuitive collection of icons representing services and groups;
2) expanded PF ruleset with each rule coming with descriptive icons, and a detailed
dynamically created comment;
3) true-realtime PF browser with anchor-path browsing and pf-table listing.
The user is able to configure and debug the PF ruleset combining these three levels of abstraction simultaneously.
The ‘Test’ button is also available, and helps debugging the ruleset without modifying runtime rules. ‘Test’ is able to find errors in PF configuration, and displays the rule that generated this error.
Murus logic lets the user choose between inclusive and/or exclusive approach to filtering. And this is true at every Murus level: groups, services, logs, accounting,NAT. Features like groups interface binding and custom policies let the user access a nearly infinite number of PF configurations.
All these features are be accessible by simply dragging and dropping icons. Experienced system administrator will be able to add custom PF rules, and to manage mixed rulesets with both Murus generated rules and custom rules.
Murus installation is safe
If you are looking for a proprietary and closed firewall solution then please look elsewhere. With Murus you are going to protect your Mac using a professional-grade fully open source solution, which is already built in into your OS X by default: PF.
Unlike many other Mac “firewalls” (or front ends), Murus does not modify OS X PF default configuration and does not install any kernel extensions. It makes only use of tools and functions already built into OS X, using its own configuration files. Here is some info:
PF is built into the OS X kernel
Murus PF configuration is saved in /etc/murus/
Murus PF boot scripts are stored in /Library/LaunchDaemons/it.murus.murusfirewallrules.plist and /etc/murus.sh
Murus library is stored in /Library/Preferences/it.murus.muruslibrary.plist
Murus user preferences are stored in ~/Library/Preferences/it.murus.Murus.plist
Murus adds an entry to both /etc/syslog.conf and /etc/newsyslog.conf in order to activate PF logging and log file rotation.
Murus uses the built-in tcpdump utility to manage PF logs
Being only a front end, when your PF firewall is running you can quit the Murus application. You don’t have to keep it running because it’s useless and potentially dangerous if you leave your keyboard alone. You should run Murus only for monitoring connections or for testing configurations. Once active, PF does not need Murus to be running and you can even trash Murus app. PF relies only on textual configuration files created by Murus.
How to install Murus
Download ZIP file from www.murusfirewall.com, unzip it and open the DMG disk image. Copy Murus icon to your desktop or to your Applications directory, or wherever you want. Double click Murus icon and provide a valid administrator account to run Murus. If you purchased a license then insert your activation email and serial number to activate and start Murus Basic or Murus Pro. If you don't have a license then you can start the free Murus Lite. You are now ready to setup and start your PF firewall.
How to uninstall Murus
Reverting your OS X system to factory default is a very easy task. Select “Murus” menu and click “Uninstall Murus”. Restart your Mac. Your Mac is now cleaned and all files installed by Murus has been deleted. PF configuration has been restored to factory default and PF has been disabled.
Murus flavors
- Murus Lite
- Murus Basic
- Murus Pro
Murus flavors comparison chart
| Lite | Basic | Pro | |
| License | Commercial | Commercial | Commercial |
| Configuration Wizard | X | X | X |
| Ports management | X | X | X |
| Inbound filtering | X | X | X |
| Inbound logging | X | X | X |
| Expanded PF Config. | X | X | X |
| Predefined Presets | 5 | 7 | 7 |
| Outbound filtering | X | X | |
| Outbound logging | X | X | |
| Port knocking | X | X | |
| Adaptive firewall | X | X | |
| Advanced Filtering | X | X | |
| Custom rules | X | X | |
| Proactivity | X | X | |
| Realtime PF Browser | X | X | |
| Totally custom ruleset | X | ||
| Manual custom rules | X | ||
| Accounting | X | ||
| NAT and forwarding | X | ||
| Hosts Inspector | X | ||
| PF states Inspector | X | ||
| Murus Logs Visualizer | available separately | available separately | included |
Murus Logs Visualizer flavors
- Murus Logs Visualizer
- Murus Logs Visualizer Tryout
Murus Logs Visualizer flavors comparison chart
| Murus Logs Visualizer | Tryout | |
| License | Commercial | Commercial |
| Realtime ports monitor | limited to blocked inbound logs | X |
| Realtime addresses monitor | limited to blocked inbound logs | X |
| Realtime notifications | X | X |
| Simplified Log | limited to last 100 log lines | X |
| Manage Ignored ports/IPs | X | |
| Graphical log statistics | limited to blocked inbound logs | X |
| Usage limits | app closes after 30 minutes | none |
Starting Murus: Strategies
Welcome view
When started Murus asks you to authenticate as administrator. This is mandatory because PF, the OS X built-in network firewall, needs root privileges in order to be managed. Even checking its status and looking at active runtime rules require root privileges.
Murus starts displaying its main window, with a picture of your Mac and a Start button. Configuration of PF firewall will be made mostly on main window. Click Start to enter the place where everything starts: Strategies view.
Strategies view

This view shows various configuration strategies. This is the place to start or restart Murus configuration, at any time. Configuring PF is not easy and can be done in several ways according to user needs, knowledge and skills. Murus provides 3 levels of configuration strategies, from the easiest to the most complicated. Select the corresponding radio-button option to switch. Each strategy can be started clicking the corresponding "RIGHT ARROW" button.
Each time you choose a strategy Murus will configure the PF firewall (with some interaction level, according to your choice) and will end up showing the editing view.
The editing view lets you look at what Murus has done and lets you modify it to suit your needs, configuring services, groups, rules, and start the PF firewall. To switch back from editing view to the Strategies view click the corresponding toolbar button.
Each time you start a strategy your old Murus configuration will be lost and a new configuration will be created.
Easy Strategies
This is the place where everybody should start from. It is also the place where you need to be in case of panic, to restore everything to factory default or to restart configuration from scratch. Select "Novice" to display the Easy Strategies view where you find three strategies.
1) Restore default configuration
The first option “restore default configuration” is not a true strategy, it just restores Murus at its default configuration. Use it whenever you need to be sure to start from scratch. Restoring to default means loosing all your custom objects (like groups, services, nat groups) so use it with care.
When you click this button and PF is enabled Murus will ask you whether to restore also runtime rules or not.
Murus default configuration does:
- block all inbound connections to your Mac's services except BASIC SERVICES and the DYNAMIC PORTS range (ports from 49152 to 65535). Connections to these two services are allowed only from predefined LAN networks (IPv4 and IPv6.). This means that no one will be able to connect to your Mac's shared documents, screen, printer, and such.
- pass incoming ICMP echo request and outgoing ICMP echo replies
- pass traffic on PAN interfaces. This means that your Mac will be able to connect to iOS devices for Continuity, Handsoff, Airdrop, Facetime, and such.
- pass all outbound connections. This means that your Mac's access to the network is unrestricted. All your network clients are allowed at network level.
2) Configuration Wizard
The Wizard is probably the most easy way to start PF.
This procedure will let you configure your Mac’s PF firewall step by step, allowing you to choose between inclusive and exclusive approach for both inbound and outbound connections, letting you choose specific access policies for your services. It will also analyze your Mac to search for local listening (open) ports and display a list of corresponding Murus Services.

The Wizard will also give the opportunity to set some basic options like logging, notifications and ban list protection. At the end of the procedure the PF firewall will be started and Murus editing view will show. Now it is possible to further modify the Murus configuration. Click “PLAY” in the Murus toolbar every time you need to apply changes.
The Wizard enables by default the Unmanaged Ports Check. If you remove a managed service added by the wizard and the corresponding local port is still open (listening) then you will see an alert in main Murus window toolbar. More about ports management later on this manual.
3) Predefined Presets
Presets are way to configure and start the PF firewall with one mouse click. Murus provides a number of predefined presets each coming with its own description.
Click predefined Presets button in Strategies view to show the Presets view. Use the slider to display all available presets.
Click the button below to activate selected preset. Now PF is active using rules generated by Murus. You can modify current rules adding and removing services and groups or changing options. Remember to click “PLAY” in the toolbar every time you modify Murus configuration in order to update runtime PF rules and apply changes.

Preserve custom groups and services
Each time you start a strategy all Murus configuration is lost and restored to default. Each strategy starts from a clean, default Murus configuration. There is an exception: you may choose to preserve custom groups and services, in case you have some of them. This option will preserve only services and groups definitions, not rules. Use this option to save time in case you need to test different strategies without the need to restore your custom objects every time.
Intermediate strategies
This strategy level actually offers only one choice: configure inclusive/exclusive firewall. You need to set this strategy’s options before starting it. When started, it will be immediately applied and Murus will show the editing view. Unlike the Wizard and Predefined Presets, the PF firewall is not automatically activated when choosing this strategy. You have to activate it (or reload its configuration) manually clicking “PLAY” in the toolbar, to update runtime PF rules.

Inclusivity and exclusivity
An exclusive firewall is a firewall that let pass all connections except explicitly blocked connections. This is the most common approach for outbound filtering.
An inclusive firewall is a firewall that block all connections by default, letting pass only explicitly allowed connections. This approach is the most secure for inbound filtering.
Inclusivity and exclusivity can be applied not only to filtering, but also logging. You have to take it into consideration when configuring PF. Murus lets you choose between these two approaches or a mix of them at many configuration levels.
Configure Inclusive/Exclusive Firewall
This strategy lets you set up global rules for inbound and outbound filtering. Both can be set as inclusive or exclusive. According to your choice it will also present some more options.
“Manage Running Services” will activate the Murus unmanaged port system.
All other options are filtering options.
Set all your parameters then start this strategy. Murus will display the editing window. You can switch between Inbound and Outbound Managed Services view to see how this strategy has affected Murus configuration.
Click “PLAY” button in the toolbar to reload PF and activate current rules.
Please note that, like all other Strategies, when you activate this strategy Murus will delete all your custom groups and services unless you checked the “Preserve my custom services and groups” option.
Expert Strategies
This view shows two different strategies. Both approached need a strong knowledge of both PF and Murus. They activate a blank firewall configuration and the user needs to configure the firewall manually using tools provided by Murus. The difference between the two strategies is how this manual task is accomplished.
Blank Firewall Configuration
As the name suggests, this strategy starts from an (almost) empty and blank firewall configuration. This is the strategy to choose if you want to configure Murus manually, dragging and dropping services and groups icons, and setting your parameters using all the graphic switches provided by Murus interface like sliders, check boxes, radio buttons. All Murus objects are represented by graphic items, they are stored in libraries and can be moved, reordered, assigned, configured using Murus interface. Next chapters will explain how to do that.
Hand Made Custom Firewall Configuration
This strategy is very similar to the previous one, as it start with a blank firewall configuration. But in this case you are going to set up your PF firewall adding manual PF rules. A PF rule is a text string containing PF actions and parameters. This strategy activates a special Murus “mode”, disabling its core structure and ignoring all managed objects. You find the corresponding option in Murus Preferences, Advanced tab, “Disable Murus Pro core ruleset”.
You choose this strategy if you don’t want to take advantage of Murus objects management abstraction and you need a total control over your ruleset. Murus offers two ways to add custom rules, and they can be used in a mixed way. Each rule can be added as a pure plain text rule, or can be “built” using the custom rules popover views buttons. Custom rules can be reordered within their range with drag and drop and edited double clicking on them.

If you choose this strategy you will configure Murus using only the Configuration View. You can display this view clicking the “DOUBLE GEAR” button in the toolbar. Murus will automatically assign option, filtering, translation, redirection and dummynet PF custom rules to their respective anchors.
Manual configuration: Murus editing View

You can configure Murus manually using the editing view. To access the editing view click "Close this panel" in Strategies view.
Murus editing view is where most of the Murus configuration is done. This view contains several sub-views that can be managed using buttons in the toolbar. Some of this views can be collapsed, while the most important view, the Managed Services view, stays always visible.
Services and Groups Libraries
Click the "BOOK" toolbal button to open/close the Murus Libraries view. This view displays on the left and is divided into 2 split views: Services Library on top, Groups Library at bottom. Both libraries contains predefined objects. You can add your own custom objects from scratch or duplicating an existing object. Custom objects can be edited, removed or reordered, while hardcoded objects can only be reordered. Click the "MAGNIFIER" button to inspect an object. Click the "SMALL GEAR" button on right top of each library to make an action. Objects are represente by icons and indicators. Click the blue "INFO" buttons to diplay the legenda.
Managed Services
The most importart view is always visible and displays Inbound Managed Services or Outbound Managed Services. Switch between the two using "ARROW DOWN" and "ARROW UP" toolbar buttons. These views show currently managed services, that is services for which you choosed a specific filtering and/or logging policy. Click the "MAGNIFIER" icon to inspect an object, and the "SMALL GEAR" button on top of Managed Services view to clean the view. Each object is represented by two or more icons. Click the blue "INFO" button to display the legenda.
Configuration
Click the "DOUBLE GEAR" button in the toolbar to display/collapse this view on Murus main window right side. This view shows a simplified and expanded view of Murus PF ruleset. This ruleset reflects current Murus configuration. It will be automatically update every time you change something in Murus. For example if you add a managed services draggin its icon, Configuration window will immediately display the new corresponding PF rule. These rule are not active in runtime until you click "PLAY" in the toolbar. You have to click "PLAY" every time you change something in order for changes to take effect in runtime. The "SMALL GEAR" button on right top of Configuration window will let you add custom rules. Selecting a rule and clicking the "MAGNIFIER" button will display the rule comment. Each rule is represented by a string and two or more icons. Click the blue "INFO" button to display a legenda.

Bandwidth Management
Click the "METER" button in the toolbar to display/collapse this view on Murus main window right side. This view shows the Dummynet pipes library. Each library may also contain a Dummynet queues library. To create a new Dummynet pipe click the small GEAR button on right-top of this view. Select a pipe and click the small MAGNIFIER button to edit its parameters. Click the blue "INFO" button to display a legenda.

Network Interfaces
Click the "ETHERNET" button in the toolbar to display/collapse this view on Murus main window right side. Each object represents a network interface available in your system. Interfaces can be inspected clicking the small MAGNIFIER button to display parameters and PF counters. Interfaces can also be ignored selecting the option "Ignore interface and pass all traffic". Doing se will issue a "set skip on <interface_name>" PF rule to skip filtering and a "no dummynet on <interface_name>" PF rule to skip bandwidth shaping. Interfaces can also be enabled or disabled.

Murus Boot Scripts: keep your PF firewall always enabled
When clicking "PLAY" or activating PF from a Strategy for the first time, a popover view will be displayed asking you if you want to install Murus Boot Scripts.
Boot Scripts allow your Mac to automatically activate PF firewall rules every time it starts. Scripts are also needed in order to enable the PF logging system, dummynet and interface forwarding.
This popover will appear every time you start (or restart) Murus clicking PLAY or running a Startegy until you install boot scripts. If this message is annoying, you can check the “Do not display this message anymore” check box before closing this popover in order to disable it.
You will be able to install and uninstall boot scripts at any time from Murus menu bar -> Firewall -> Boot Scripts.
How PF starts at boot: some technical info
PF is loaded at boot time using two different files. These files are automatically installed if you tell Murus to "install boot scripts". However you can manage these files manually if you need to.
1) it.murus.murusfirewallrules.plist, stored in /Library/LaunchDaemons, is a launchd item. This thing is responsible for executing a bash script at system startup.
2) /etc/murus.sh is a bash script executed at startup time. Its purpose is to enable PF and to load PF rules generated by Murus. It also creates the “pflog0” network interface needed for PF logging, and starts the PF logging system using tcpdump. It sets up sysctl needed for interface forwarding and loads dummynet configuration file using ipfw or dnctl according to OS X version.
Problems loading PF rules at system boot
PF will not load at boot if you configured PF using network interfaces that are not available at boot time, for example VLANs. To overcome this problem you should write your custom PF rules putting interface names in parenthesis, like (vlan0) or even (vlan3:network). Murus 1.1 automatically manages this so you have to take care only of your custom rules. Please note that using parenthesis in NAT rules no longer works on OS X 10.11. To monitor PF status and to be notified of problems at boot time you can use the free Murus Menulet add-on app.
Murus Menulet: constantly monitor PF status
You are strongly encouraged to install Murus Menulet, a free independent companion app for Murus. Murus Menulet simply displays the PF status in OS X menubar in real time. It runs automatically at login and it does not need Murus to be running.
Murus Menulet is very useful because it tells you if your Mac is running a Murus configuration or not. This is specially useful after a reboot. In case an interface is not available, Murus ruleset will not be enabled, and probably a default OS X ruleset will be enabled. Murus Menulet is the easiest way to get notified about such events.
Murus Menulet has three statuses:
1) pf active with a typical Murus ruleset
2) pf active with a default OS X ruleset or a handmade/third party ruleset
3) pf is disabled
Current PF Status
If you never used PF on your Mac and you run Murus for the first time, PF will be probably disabled. PF status is displayed in the Murus main window’s toolbar, on the right.
Color indicates PF Status:
GREEN: PF is active using a Murus ruleset. Please note that this does not necessarily means that current Murus configuration and current PF running rules do match.
YELLOW: PF is active but it is not using a typical Murus ruleset. So probably it is active using a custom ruleset or the default OS
X ruleset.
RED: PF is not enabled.
Please note that both the shell terminal pfctl command and Murus Runtime PF Rules Browser will display current runtime PF rules even if PF is disabled. You may also use the shell terminal to enable or disable PF:
ENABLE: sudo pfctl -e (or sudo pfctl -E if you want to use tokens like Murus)
DISABLE: sudo pfctl -d
To manually load Murus PF ruleset you have to enable PF and then load the ruleset with this shell command: sudo pfctl -f /etc/murus/murus.conf
Services and Groups
Services
A Murus Service is an object with an icon, a name, a description, a ports list and a protocol (TCP, UDP ,TCP+UDP, or TCP+UDP+ESP+GRE). This is used to represent network services, typically TCP and UDP services for which you run clients and or servers on your Mac.

Services Library
‘BOOK’ toolbar button opens/closes the Libraries view. Services Library is a collection of icons, each one representing a network service, for example FTP, SSH, PRINTER, MAIL. These are all services known to Murus. Select a service icon and click the magnifier button to open the service popover window and see descriptions, ports and protocol. Default services cannot be edited. You can, however, change their order in the library to meet your needs. To reorder services just drag and drop their icon. The order affects PF States Inspector icons.
Click the “SMALL GEAR” button on right top of the Services Library view to add a new custom service. The service will be created at the end of Services Library. Select it and click the magnifier button to open the edit popover window. Change service name from “CUSTOM SERVICE” to a name that suites its purpose. Please do not exceed the available text space when choosing a new name. Define service port range by inserting port numbers separated by space. Define ports ranges using colon. Choose the service protocol: ‘all’ means ‘TCP and UDP’, while ‘esp/gre’ means ’TCP,UDP,ESP,GRE altogether’. You may want also to write a short description for this service. You can have services using the same ports and even the same description, but not the same name. Services name is uppercase only, it may contain spaces and number but please avoid any special character.
Groups
A Murus Group is an object with an icon, a name, a network interface and a list of IP and/or Network addresses. They can be both ipv4 and ipv6 addresses. Network addresses must be in CIDR notation.

Groups Library
Click "BOOK" toolbar button to display the Libraries view. Groups Library is the bottom view. Groups are represented by icons. Icons may appear differently according to the number of records and/or addresses contained in each group. A Murus Group holds a list of IP and/or network addresses and can optionally be bound to a network interface. Binding a group to an interface means that rules generated by this group will be effective only on such interface. Murus has 5 hardcoded groups that cannot be changed or modified.
Custom Groups
Click the “SMALL GEAR” button to add custom groups. Choose a name for the group. Name must be lowercase and you should avoid using (leading)numbers, spaces and special characters. Use the popup button to bind the group to a specific network interface. If you don’t want the group to be bound just leave ‘all’ in place. If you bind the group to a specific interface then all rules generated by Murus assigning this group to a Service will be effective only on this interface.
Nation Groups
Click the “EARTH” button to add nation-groups. These groups are represented by a country name and flag, and contains all IPv4 address space assigned to a specific country. Data are obtained, parsed and optimized reading Regional Internet Registries public servers directly. Subnets are then aggregated to improve firewall performance. Nation-groups cannot be modified, however they can be kept in synch with current RIR databases.
Special services and groups
Murus makes use of some special services and groups in order to work properly. These special objects are already hardcoded into Murus and cannot be removed or edited. You will need to understand their meaning and their use in order to get the maximum out of Murus and PF.
Service ALL SERVICES: This meta-service represents all possible TCP and UDP services available, from port 1 to port 65535. This service is used to define to default policy for filtering, logging, and all other Murus services’ options. This service can be put only at the beginning of your managed areas and cannot be moved. You can, however, make custom copy of it and use it as you need.
Service DYNAMIC PORTS: This service includes all TCP and UDP ports from port 49152 to port 65535. This range is known as “Dynamic ports” range. Many services (both clients and servers) may require connections on this port range, so it is a common practice to allow traffic on these ports. You can, however, decide to block this ports range. If you want to increase your security you can create a custom service using the same ports range only for UDP protocol.
Group blocked-hosts:
This group can't be deleted or renamed but its content can be modified. You can manually add or remove addresses. This group is blacklisted and cannot be removed from blacklist. All connections from/to contained addresses will be blocked. This group is also used for the interaction between Murus and other applications such as Murus Logs Visualizer, Murus Services and third party apps and/or scripts making use of Murus Agent or other tools. For example if you select an address in Murus Logs Visualizer and choose to black list it, then Murus will put this IP in this special group.
Group Everyone:
Groups Everyone represents the whole Internet.
It contains two network addresses:
0.0.0.0/0 This means “All ipv4 addresses”
::/0 This means “All ipv6 addresses”
This group is used normally when you want to put general rules on services. It is bound to the meta-interface “all”, which means that it is effective on all network interfaces (except the lo0 loopback interface which is totally ignored by Murus PF ruleset).
Cloning special services and groups
In some cases you may need to create copies (clones) of “special” services and groups. For example you may need to create a copy of the ALL SERVICES service when you want to assign different rules to different network interfaces. And you also may need to create clones of “Everyone” group bound to specific interfaces. For example you create group “everyone_en1” bound to the en1 network interface.
Firewall Rules
PF Filtering
From OpenBSD PF manual:
<< Filter rules specify the criteria that a packet must match and the resulting action, either block or pass, that is taken when a match is found. Filter rules are evaluated in sequential order, first to last. Unless the packet matches a rule containing the quick keyword, the packet will be evaluated against all filter rules before the final action is taken. The last rule to match is the "winner" and will dictate what action to take on the packet.
Default Murus Filtering Policy
The recommended practice when setting up a firewall is to take a "default deny" (inclusive) approach. That is, to deny everything and then selectively allow certain traffic through the firewall. This approach is recommended because it errs on the side of caution and also makes writing a ruleset easier.
Traffic must be explicitly passed through the firewall or it will be dropped by the default deny policy. This is where packet criteria such as source/destination port, source/destination address, and protocol come into play. Whenever traffic is permitted to pass through the firewall the rule(s) should be written to be as restrictive as possible. This is to ensure that the intended traffic, and only the intended traffic, is permitted to pass.
The PF “quick” keyword
Each packet is evaluated against the filter ruleset from top to bottom. By default, the packet is marked for passage, which can be changed by any rule, and could be changed back and forth several times before the end of the filter rules. The last matching rule "wins". There is an exception to this: The quick option on a filtering rule has the effect of canceling any further rule processing and causes the specified action to be taken.
The PF quick keyword is used by some Murus hardcoded rules and can be optionally set for Murus custom rules. >>
Murus three layers of abstraction
Murus lets the user configure firewall rules using three different layers of abstraction. Each one features its own logic and purpose.
- 1) Managed Inbound and Outbound Services views
do manual configuration here - 2) Expanded PF Configuration window
verify and understand configuration logic, add custom rules - 3) Runtime PF Rules Browser window
see runtime rules to debug current running ruleset
In addition, you may want to use Murus Logs Visualizer, to get a real time simplified log file representation which allows you to fine tune both filtering and logging policies very easily. Murus Logs Visualizer is a standalone application available at www.murusfirewall.com.
1) Managed Inbound and Outbound Services views
These views represent the first layer of abstraction of your PF ruleset offered by Murus. Firewall filtering rules are generated assigning services to the “Inbound” and “Outbound” Managed Services views, and assigning groups to such services. The “Inbound” view is the most important, because it’s the place where you decide how other people can access your Mac’s services from remote computers on the network. Inbound connections are connections initiated by someone and targeting you, while outbound connections are connections initiated by you and targeting someone else. Please do not confuse inbound/outbound with download/upload. Both inbound and oubound connections do make traffic in both ways, up and down. This is very important to understand as Murus approach is to use Stateful firewall filtering.
Service Access Rules
Select the “Mananged Inbound Services” view clicking the “ARROW DOWN” toolbar button, and drag services from the Services Library to the Mananged Inbound Services view.
By default, all services added have a green facing-down triangle. This means that inbound connections are allowed from everyone. You can change access rules for every service. Service led will change to yellow or red according to access rules.
Select a service in the “Inbound” view and click the magnifier icon to open the Service Rule Popover. Here you see 3 columns. Drag groups from the column on the left (Groups Library) to “Allowed Groups” and/or “Blocked Groups” in order to allow and block connections. Please note: block rules override pass rules. Blocks are meant to be used as exceptions to passes. For example you may put an entire C class in “Allowed groups” and put an IP belonging to this class in “Blocked groups”, as an exception. The effect of assigning a group to a service can be immediately seen into the Murus Configuration window. A new rule will be generated for each group you add.
 In this screenshot you see an example for the VNC Screen Sharing service. We assume groups “mario” and “luigi” contains their respective IP addresses in the 192.168-net class (for example 192.168.0.2 and 192.168.0.3). We assign the “192.168-net” group to “Allowed Groups” to allow connections to our local VNC service from all computers in the 192.168.0.0/16 network address space (from 192.168.0.0 to 192.168.255.255). Then we assign groups “mario” and “luigi” to “Blocked Groups” in order to override access permission for their IP addresses, blocking them.
Everytime you add a service to managed services and you assign groups to it, Murus generates new PF rules. In Murus Inbound and Outbound views PF rules are generated reading services from left to right, row by row from top to bottom in both Inbound and Outbound areas. To change rules order you have to change services icons using drag and drop. Filtering Inbound connections is usually enough for a normal firewall configuration. If you feel paranoid you can also filter outbound connections. By default Murus allows all outbound configuration, leaving the ALL SERVICES alone with the green led in Managed Outbound Services view. This means that your Mac client applications are able to make all kinds of connections to remote servers. Filtering outbound is usually useful when you want to restrict the freedom of access to the network from your Mac. In case you run a NAT router with Murus please avoid applying unethical restrictions to your clients.
2) Expanded PF Configuration window
This window represents the second layer of abstraction of your PF ruleset. To display the Expanded PF Configuration view click the “DOUBLE GEAR” button in the toolbar. This view is the second most important thing to understand in Murus.
In this window you see rules represented by icons and a string. Click the blue “INFO” button in the toolbar to see an explanation for all these icons and symbols.
Every time you add, remove or move a service or assign a group in Managed Inbound/Outbound Services views, the Expanded PF Configuration window is updated.
Rule Comment
Select a rule and click the magnifier button to display dynamically generated comment for this rule. This will help you understand why this rule is here and how it affects network connections. You can create your own comments for custom rules.
PF Rules and Anchors
PF rules are organized like files in a filesystem. Some rules are in the root, some others are in “anchors”. Anchors are rules containers just like directories are files containers. Murus makes use of anchors to separate inbound and outbound filtering rules
from options rules, redirection, translation and dummynet rules.
Being a simplified layer of abstraction, Expanded PF Ruleset does not show the ruleset as a tree but as an expanded view. Rules are in listed at the same level but filtering rules order is preserved.
Please not that these rules does not necessarily represent currently active firewall rules. They represent instead the configuration obtained by current Murus configuration. Every time you make a change in Murus configuration, this window gets updated, but PF runtime rules are not. You have to click “PLAY” in Murus toolbar every time you need to apply changes.
Custom Rules
Click the top-right SMALL GEAR button to open the PF custom rule popover view. Here you can create a custom rule selecting values from popup menus and buttons, and typing addresses, ports and other optional rule parameters in text field.
You also have the option to create a manual PF rule, typing your own command. Click the “GEAR” button to open a new popover view to add a manual custom rule.

Custom filtering rules will be added to /murus.custom anchor. NAT rules will be added to /murus.nat anchor. Forwarding (redirection) rules will be added to /murus.rdr anchor. Dummynet (bandwidth) rules will be added to /murus.bw anchor.
Custom Redirection Rules
To add a custom redirection rule you can select the “rdr” or “rdr pass” action, and use the specific field to set the forwarding IP address. Examples:
10.0.0.1 to forward to IP 10.0.0.1 using the same target port
10.0.0.1 port 45 to forward to 10.0.0.1 port 45
10.0.0.1 port {23 24 25} to forward to 10.0.0.1 ports 23, 24 and 25.
To add a custom NAT (translation) rule you need to check the "Disable Murus Pro core ruleset" in Murus Preferences - Advanced, and add a manual rule clicking the gear button. You can add “nat on” or “nat pass on” PF rules. Please read the PF manual for more info about the syntax.
Custom rules can be edited. To edit a custom rule just double click on it. The custom rules popover will appear. Make your changes and click the apply button. The rule is now changed. Click the “PLAY” button in Murus toolbar to apply changes to runtime PF rules.
3) Runtime rules browser window
This is the third layer of abstraction offered by Murus. It shows PF runtime rules in a browser-like window. These are true, live, running PF rules. This window automatically updates every time you click “UPDATE ARROW” in Browser window or click “PLAY” in the Murus main window toolbar.
There are three views on this window. You can switch view selecting the 3-ways segmented control in this window's toolbar.
1) default view shows current root PF rules and PF tables. To display anchors' PF rules use navigation buttons or double click. Current position in PF path is displayed in the toolbar.
2) the second view displays the complete PF ruleset in a single outline view. By default it displays only filtering rules while NAT/redirection and dummynet rules are ignored. Select the corresponding checkbox to include NAT/redirection and/or dummynet rules. This view does not display PF tables.
3) the third view displays currenlty active Dummynet pipes and queues
Runtime rules browser window is the place where filtering actually occurs and where you want to look when troubleshooting your ruleset. As you can see, rules and anchor are numbered. This is really important when reading log files, because each log line shows which PF rule has generated it. This is done by indicating the full rule path using rules numbers. Numbers are automatically assigned at runtime by the kernel, not by Murus, and cannot be changed. Please note: PF rules are visible in the Murus browser (and in the shell terminal using pfctl) even if PF is currently disabled.
PF path
You see the current path on top of browser window. Starting path is the root, represented by “/“. Select an anchor and click the “>” or double-click it to change path and see its content. Click “<“ button to go back one level, click the “HOME” icon button to go back to PF ruleset root. PF path is useful only when using the first view.
PF tables
PF tables are used by PF to hold addresses list. Murus uses PF tables in order to simplify firewall configuration. Basically Murus creates a PF table for each Murus Groups defined in Murus Groups Library. There are also some hardcoded PF Table used by Murus rules logic.
Select a PF Table and click the magnifier icon to see the PF Table content.
Please note: Murus Groups are objects defined into the Murus application. PF Tables are runtime objects used by the OS X PF firewall.
While it is technically possible (and a common practice when creating manual PF configurations using the shell terminal or scripts) to modify runtime PF Tables content, Murus does not allow to do it in its interface. PF Tables will be automatically created or modified every time you reload PF clicking the “Start” button in main Murus window, according to your Murus ruleset. You can, however, modify them using the pfctl shell command. This will obviously affect the PF ruleset in a way Murus cannot be aware of. So take care.
There is an exception. You can manually empty the “bruteforce” PF Table in “murus.inbound” anchor. This PF Table contains addresses blocked by the anti- bruteforce system provided by Murus. A “X” button will appear in the PF Table popover: click it to empty the PF table.
Real PF Configuration
The reason why we need 3 layers of abstraction is quite clear if you look at the real PF configuration files. They are stored in a hidden directory, accessible from the shell terminal or from the finder if you tweaked your system somehow.
The directory is /etc/murus.
It contains a bunch of files, most notably murus.conf which is the first file invoked by PF when reading its configuration. All other murus.* files are referenced in murus.conf. They contain Murus anchors’ PF rules and PF tables definitions.
Manually editing Murus PF ruleset from shell terminal
You should not edit manually Murus files stored in /etc/murus if you plan to use Murus regularly, because your tweaks will be overwritten every time you click PLAY. If you do modify them then please remember that you have to restart PF from the shell terminal and not from Murus, or your settings will be lost. To start PF using a hand- modified murus ruleset you have to type this command in shell terminal:
sudo pfctl -f /etc/murus/murus.conf
This command will tell PF to load rules from /etc/murus/murus.conf. If PF is not enabled you have to enabled it:
sudo pfctl -e
You can’t use Murus to make changes (because you will loose your hand-made changes) but you can use Murus runtime browser to see active rules. Open it from toolbar TOOLS menu. Instead of manually editing the ruleset in shell terminal, you can select the Murus option to “Disable Murus core ruleset” in the Preferences. This option will give you the same freedom as editing the PF ruleset with pico or vi in the terminal. Select it in Murus Preferences, then open Expanded PF Configuration;: all hardcoded and dynamically generated rules are gone. You can add custom rules and create a totally customized PF ruleset using only your PF rules. Custom rules can be reordered and can be deleted from this window. You can add filtering, translation, redirection and dummynet custom rules and create a totally functional and customized ruleset yet taking advantage of other Murus features.
Inclusive and Exclusive rulesets
There are two basic ways to create firewall rulesets: “inclusive” or “exclusive”. An exclusive firewall allows all traffic through except for the traffic matching the ruleset. An inclusive firewall does the reverse. It only allows traffic matching the rules through and blocks everything else.
PF typically uses an inclusive approach to rules. In its starting configuration, Murus blocks all inbound connections except connections to “BASIC SERVICES” (mDNS, ldap, nntp, dhcp) and allows all outbound connections.
The meta-service “ALL SERVICES” holds all tcp and udp network services (from port 1 to port 65535). The meta-groups “Everyone” holds all IPv4 and IPv6 addresses. You should make use of them when dealing with inclusive/exclusive rulesets.
A way to increase granularity and to fine tune your firewall rules is to bind groups to interfaces. Assigning a group to a service Murus generates a PF rule. If such group is bound to a network interface, such rule will be effective only in that interface.
Inclusive Ruleset
Example of inclusive ruleset. All inbound connections are blocked, except connections explicitly allowed. In this screenshot we allow all inbound connections coming from everyone on the Internet and targeting this Mac’s local AFP, VNC and PRINTER services. We also allow inbound connections to BASIC SERVICES and DYNAMIC PORTS services, but with a restricted access underlined by the yellow led.

Please notice that this configuration lacks the ALL SERVICES service. There is no difference between adding the ALL SERVICES service with the RED dot, or removing the service. In both cases all services are blocked by default.
Exclusive Ruleset
Example of exclusive ruleset. Please notice the presence of ALL SERVICES special service with a GREEN dot.

All inbound connections are allowed, except connections explicitly blocked. In this screenshot we allow all inbound connections from remote clients to local services, except connections to local SSH and PRINTER services. Like the previous example, service BASIC SERVICE has a yellow dot, meaning its access is restricted to one or more groups.
The ALL SERVICES meta service
Assigning the black or green pencil (or any other service option) to the ALL SERVICES special service affects the global policy. Rules are generated reading icons from left to right, row by row. All filtering rules and logging rules generated by adding icons to Inbound and Outbound views may be overridden by forthcoming rules. This is the reason why service ALL SERVICES can’t be moved. If added, it will be put at the beginning of the icon list, because global rules generated by this service must be overridden by rules generated adding common services.
Advanced Filtering
Inbound Service Options
Select a service in Managed Inbound Services view and click the magnifier icon to open the Inbound Rule popover view.
Click the ‘gear’ button to display/collapse the Options view for selected service. This is the place where you configure inbound filtering advanced options.

Set for accounting
Check this button to activate traffic counters for selected service. Access counters from Murus main window toolbar clicking “TOOLS” button and then clicking “Accounting” button. Counters will be reset every time you click “PLAY” in main Murus window toolbar.
Log connections
Check these buttons to explicitly log connections from allowed and/or blocked groups. Please note that these options are affected by global Murus logging policy and by Murus Advanced Preferences. More about this topic later in this manual.
Notify blocks and access in Logs Visualizer
Check these buttons to activate the Murus Logs Visualizer notification system for this service. Notifications will appear in the right top corner of your OS X desktop, together with all other notifications from OS X apps, third party apps and web sites. Please note that this feature requires you to install and run Murus Logs Visualizer, which is a standalone application available separately from Murus.
These options are available only if logging is enabled for selected service.
Static filtering
Murus uses stateful packet filtering by default for every service added to Inbound and Managed Outbound Services.
Static filtering is a particular way to allow connections to services. This option affects only “pass” rules, not “block” rules generated by this inbound service. Check this button to enable static filtering for this service. Access to service is granted by two rules: an inbound pass rule and an outbound pass rule. Stateful firewall is disabled for this service, so no states will be created for passed connections. All packets will be evaluated by the PF ruleset instead of flowing through dynamically created states. This option may be useful for services like KERBEROS or for some game.
Less restrictive flags policy
By default stateful packet filtering rules accept TCP packets only with S/SA flags. This is the most common practice with PF, but you may want to be more permissive enabling access to packets with any type of flags. Check this button to enable this more permissive flags policy on selected service. This option may be useful in some case with services like AFP, SMB, NFS, WebDAV and such. Please note that ‘Static filtering’ and ‘Less restrictive’ flags policy options are mutually exclusive.
Brute force adaptive service
Adaptive firewall is a way to proactively pass or block connections according to network activity quality, quantity, type, timings, and such.
Murus uses adaptive rules to block a very common remote attack named “brute force”.
“Brute force” is a way to gain access to a network service trying login/password combinations from common lists or randomly generated lists. This is a way to get unauthorized access to services like SSH and TELNET and others, and it is a potentially dangerous threat for everyone running such services.
Check this button to enable adaptive filtering for selected service. Use the sliders to set the max amount of connections (for each remote IP address) in a specific amount of time.
If a remote client exceeds these limits, PF will put its IP address in a specific ban list, and will consider it as hostile. All network connections from this IP address will be blocked.
Please note that some more sophisticated services may be able to offer the same protection at application level. Some other services (like AFP and VNC and other Kerberos based services) may suffer from such kind of adaptive filtering, so they require a specific care. In both cases you are advised to frequently monitor these services in case you set the adaptive option, and increase the value of both sliders in case you see IP addresses unexpectedly blocked.
Brute force blocks can be set to automatically expire at a given time. Open Murus Preferences, select Proactivity tab and check the option. Move the slider to choose the expire time. Click the save button to immediately activate the system.
Forward service to NAT client
Check this box to forward inbound connections to a NAT client. This option is effective when you are using your Mac as a dual-homed router running Murus NAT, and you want to make some of their services available to the public interface. The easiest way to export a service is to check this box and enter the LAN IP address of your local NAT client. You can leave the ‘Ports’ field empty, so all service ports will be forwarded to the NAT client’s same exact ports.
If you want to forward a service to different ports then you can specify them in the ‘Ports’ field but you have to take care because you must insert the same number of ports. For example if the service uses a ports list like “200 201 210:215” (that is a list made of 8 ports) you need to forward it to 8 ports, no more no less.
Please note that port forwarding will not work with OS X System Preferences's Internet Sharing!!! You need to do NAT using Murus. Please disable OS X Internet Sharing in OS X System Preferences -> Sharing prefpane before activating Murus NAT.
Outbound Service Options
Select a service in Managed Outbound Services view and click the magnifier icon to open the Outbound Rule popover view.
The first three options has been covered in the previous chapter. Their effect on PF ruleset is the same. Obviously they will be applied to outbound rules.
Pass no-state inbound replies
The forth option is an outbound-specific option used for services that require a “job monitoring” connection. This option is important for PRINTER and SCANNER services. If you want to use a network printer and allow remote job monitoring (that is a very common feature for almost all OS X printer drivers or application bundles) you should add the PRINTER service to your Managed Outbound Service view and check this option. You should do this even if you are not doing any outbound filtering (you have only the ALL SERVICES service added with a green led). This option adds a static filtering rule to allow inbound traffic coming from remote service port.
For security reasons, the best practice is to activate this option only for services with a very restricted access. So, for example, you should assign to outbound PRINTER service only one group in “Allowed Groups”, and this groups should contains only your printers IP addresses.
Ports Management
Murus Ports Management is a tool used to help configuring the Murus Managed Inbound Services. The system works and is effective only when Murus application is running.
Open Murus Preferences and select “Ports” tab to open the Ports Management preferences. Select “Check local ports” to activate the system. Now Murus will continuously check for local listening ports. Murus checks only ports from 1 to 49151. By default Murus shows only ports included in services definitions, but you can choose to display all unmanaged ports as well.
If an open port has a corresponding service in the Murus Managed Inbound Services then it will be considered as “managed”. If an open port lacks the corresponding service in the Murus Managed Inbound Services then it is considered “unmanaged”.
Being “unmanaged”, connections to this port will be passed or blocked according to the global Murus inbound filtering rules. Managing a port means that you can assign specific filtering and logging options to inbound connections to this port. To manage a port you need to assign the corresponding service to the Murus Managed Inbound Services area.
This can be done in two ways: manually or automatically. By default Murus is set to handle this thing manually.
Manual Ports Management
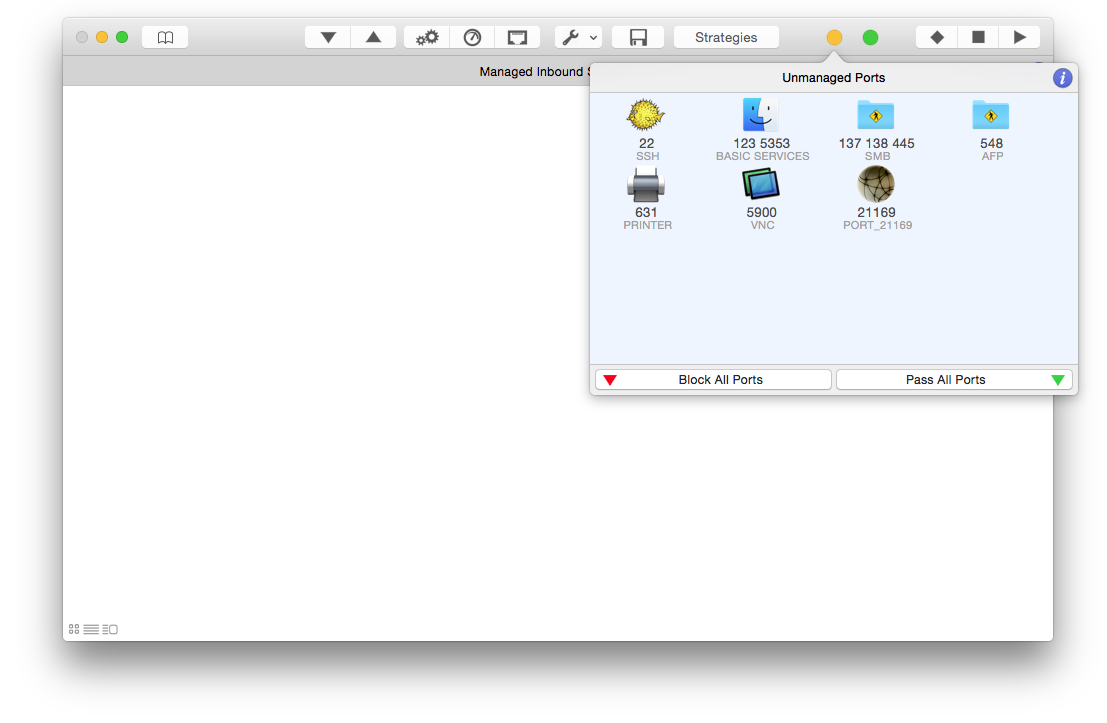
If there are unmanaged open ports Murus will display an alert with a yellow dot in the toolbar, near the PF status indicator. Click this alert to open the Unmanaged Ports popover view, which displays all unmanaged ports and the corresponding Murus Service. Some time more ports can be nested in the same service. Some time Murus Service Library does not contain a corresponding service for a given port. In this case you will see a service with a generic icon and a generic name.
Select a service in the Unmanaged Ports popover and click one of the “+” buttona to manage the service. The service icon will disappear from the Unmanaged Ports view, and will appear in the Murus Managed Inbound Services area. Select it to change or fine tune access permissions and options. Runtime PF rules has not been changed yet: remember, you have to click “PLAY” in the toolbar to apply changes. Now the service is managed. You can proceed and click “+” on all unmanaged ports icons. The yellow dot alert will become green when there are no unmanaged open ports.
Automatic Ports Management
Select the “Auto Manage Ports” button in Prefefences to activate the automatic ports management. If an unmanaged open ports is detected (for example if you start a service like Screen Sharing) then Murus will automatically assign the corresponding Murus service to the Murus Managed Inbound Services area. It will add it using permissions set in the Ports Preferences. You have 5 permissions options to choose from. The check is continuous but will work only if Murus application is open. Please note: this is not to be used as a “live” protection system. Automatic ports management should be used to help configuring the firewall, testing different scenarios and dealing with unknown/ unpredictable app behaviors. It is a tool that works only when Murus app is running and is useful only for configuration, testing and debug. Murus application should normally be left closed because PF works in background.
Emerging Threats Ban List
Open Murus Preferences and select the Proactivity tab. Check the “Activate URL- based ban list protection and auto update” option to activate this protection system. OS X will silently download from a given URL a list of dangerous well- known IP addresses and block all inbound and outbound traffic from/to these IP addresses. This system works in background. Murus provides a default URL (from the free emergingthreats.net online service) but you can use your own URL. Use the slider to set the update frequency. If you use the default URL please set the slider to the maximum value (24 hours) for always-on Macs, and set it to 720 minutes (12 hours) for all other Macs.
Murus Preferences
Click the ‘Murus’ button in Murus menu bar then click the ‘Preferences’ button to open the Murus Preferences window.
This is the place where you set some important options that affect PF filtering and logging.
- 1) General
Here we set some filtering and logging option. - 2) Advanced
Here we set some very important options that affect the whole Murus filtering logic - 3) Ports
Unmanaged ports check - 4) Port Knocking
This is the place where you configure access to hidden services. - 5) Logs
Here we set PF log file rotation parameters. - 6) Proactivity
Set proactivity timings and options - 6) Bandwidth
Exclude a Murus group from bandwidth shaping

General Preferences
1) Log all blocked connections
By default this option is checked. This means that all inbound blocked connections will be logged to file. If you uncheck it then blocked connections will not be logged, except for services where the logging option is explicitly specified.
In case this option is checked and active, in order to avoid logging a blocked connection to a specific service from a specific group, you must add this service to the Managed Inbound Services view, assign the group to ‘Blocked Groups’, remove all groups from ‘Allowed Groups’ and verify that the “log blocked connections” option in Service Options is unchecked. This is a way to override the global block rule (which logs everything) with a specific per-service rule which blocks everything but does not log block to file.
1b) Log blacklisted connections
By default blacklisted connections are not logged. However you may change this behaviour switching this option.
2) Preserve Apple PF anchor
Some OS X service needs specific PF rules. These rules are included in a configuration file installed by OS X that contains Apple specific PF rules. You may decide to include these rules into your ruleset to maximize compatibility with some current or future OS X service.
3) Block ICMP echo replies
ICMP traffic is passed by Murus. You may want to block ICMP echo replies. This is useful if you prevent remote clients to be able to “ping” your Mac and obtain a reply.
4) Pass IPv4 and IPv6 essential system services / Pass IGMP
Check this two boxes to allow connections to some commonly needed network service and protocols, including DHCP, multicast DNS, IPv6 ICMP and IGMP. This option is useful to improve your experience while browsing the local network for services like file sharing or screen sharing. They are useful also for some OSX/iOS
synch and pairing network activity.
5) Pass all multicast traffic
Check this box to allow multicast traffic. While this may not be necessary, it is a common practice to allow these connections. Uncheck it only if you need a paranoid level of protection or if you have a strong valid reason to block multicast traffic.
6) Pass all PAN traffic
Check this box to allow traffic on you Personal Area Network interfaces (like awdl0 and p2p0). This is needed for interaction between Macs and iOS devices.
7) Check for updates at Murus launch
Check this box to let Murus make a connection to murusfirewall.com web site and see if there are updates for you every time you run Murus.app.
This option is disabled by default because we do NOT like applications phoning home. Murus does not make ANY CONNECTION AT ALL you are not aware of. When checking for update availability Murus does not send/leak any data from your Mac. It simply makes an http query to our servers to get a string and compare it to the current Murus version.
Ports Preferences
Use this panel to configure the Murus Ports Management system, described in another chapter of this manual
Advanced Preferences
There are there groups of options in this section.
These two options are checked by default. They affect the way Murus generates rules when adding a Service to, in turn, Inbound or Managed Outbound Services.
When this option in unchecked and inactive, Murus will add for each managed Service:
- a pass rule for every group added to “Allowed Groups”
- a block rule for every group added to “Blocked Groups”
When this option is checked and active, Murus will add for each managed Service:
- a leading dedicated per-service global block rule that blocks all connections to this service
- a pass rule for every group added to “Allowed Groups”
- a block rule for every group added to “Blocked Groups”
Please keep the Murus Expanded PF Confoguration window open in order to see how these options affect inbound and outbound filtering.
Enable normalization
Normalization is a common practice in most firewall setups. It is used to optimize the firewall filtering engine reassembling fragmented packets and discarding packets with invalid flags. This option increases firewall CPU usage and, in some case, may increase network latency affecting realtime applications.
Disable Murus Pro core ruleset
Check this option to disable all Murus dynamically generated rules. This is useful if you want to configure a completely custom PF ruleset, starting from an almost empty ruleset, adding your own custom filtering, nat and rdr rules.
Skip loopback interface
Loopback interface (lo0) is always ignored by PF. By default this option is checked and lo0 is ignored using the "set skip on lo0" PF rule. Sometime it is necessary to uncheck this option, to ignore lo0 using the "pass quick on lo0 no state" PF rule.
Port Knocking Preferences
This is the place where you define the sequence used to access your hidden services. You will share this sequence with your clients, in order to allow them to access your hidden network services.
First of all you need to define your knocking password, which is made by three numbers. Choose three random numbers in the range from 10000 to 40000. Type these numbers in text fields ‘Key1’, ‘Key2’ and ‘Key3’. You will not be able to see typed number because they are hidden.
Then you have to define your knocking sequence. This is achieved selecting random numbers from the four popup buttons. Each button can be set with a value from 2 to 9.
Remote clients needs to use the free and multiplatform Murus Knocker to get access to your hidden service. To be able to connect to your Mac’s hidden services you must provide to your clients:
- 1) the knocking password made of 3 numbers
- 2) the knocking sequence made of 4 numbers
- 3) your public IP address
Clients providing the correct knocking sequence will have access to all your hidden services. Clients failing to provide the sequence will be blocked. Use Murus Proactivity to manage port knocking authorizations and bans.
Murus Knocker is free and available at www.murusfirewall.com. It requires Java. It has been tested on OS X, Linux, Windows.
Murus uses a specific PF anchor for port knocking rules. This anchor is generated only if you have set at least an inbound hidden service.
Logs Preferences
Here you set only log file rotation parameters.
PF log file is stored in file pffirewall.log in /var/log directory. This file may become very big over time. When this file reaches a specific size, OS X archives it in a compressed file and generates a new empty log file. This procedure is called log rotation.
Archived log files are incrementally stored in /var/log directory and they can be directly accessed (without uncompressing them) by both OS X Console.app (found in your Applications/Utility directory) and Murus Logs Visalizer graphical statistics.
The first slider is used to define the maximum log file size, expressed in MBytes.
Once reached this size the file is rotated. Please note that this number refers to the size of the plain uncompressed log file. When archived, log files will be much smaller.
In order to avoid filling your hard disk with log file (this may happen maliciously or not) you will have a maximum number of rotated log files. The second slider sets this limit. So if you set it to 15, OS X will keep only the latest (newest) 15 archived log files. So when you already have 15 archived log files, OS X will delete the latest (oldest) archived file when creating a new one. The number of archived log file will never exceed the number of 15.
Click the button to save log file rotation settings.
Log rotation preferences are stored in two default OS X system files in /etc directory:
- syslog.conf
- newsyslog.conf
These files are read by OS X at boot time. For this reason you must reboot your Mac to apply changes to the log file rotation policy.
Proactivity Preference
Use this panel to automatically reset port knocking and brute force authorizations and blocks at a given time, and to optionally activate the Ban List protection system.
PF States Inspector
Understanding PF States
From OpenBSD PF manual:
<< One of Packet Filter's important abilities is "keeping state" or "stateful inspection". Stateful inspection refers to PF's ability to track the state, or progress, of a network connection. By storing information about each connection in a state table, PF is able to quickly determine if a packet passing through the firewall belongs to an already established connection. If it does, it is passed through the firewall without going through ruleset evaluation.
Keeping state has many advantages including simpler rulesets and better packet filtering performance. PF is able to match packets moving in either direction to state table entries meaning that filter rules which pass returning traffic don't need to be written. And, since packets matching stateful connections don't go through ruleset evaluation, the time PF spends processing those packets can be greatly lessened.
When a rule creates state, the first packet matching the rule creates a "state" between the sender and receiver. Now, not only do packets going from the sender to receiver match the state entry and bypass ruleset evaluation, but so do the reply packets from receiver to sender.
All pass rules automatically create a state entry when a packet matches the rule. This can be explicitly disabled by using the Murus “Static filtering” option for Managed Inbound Services (which in turn generates a PF rule with the “no state” option).
Keeping State for UDP
UDP is a stateless protocol. While it is true that a UDP communication session does not have any concept of state (an explicit start and stop of communications), this does not have any impact on PF's ability to create state for a UDP session. In the case of protocols without "start" and "end" packets, PF simply keeps track of how long it has been since a matching packet has gone through. If the timeout is reached, the state is cleared. >>
Murus uses PF stateful inspection
By default all pass rules generated by Murus Managed Services and by Murus hardcoded/optional rule do use PF stateful inspection. A state will be created for each passed connection. You can however tell Murus to avoid using stateful inspection selecting the “Static filtering” option for Managed Inbound Services. You can also add custom rules using the “no state” PF option.
Murus PF States Inspector
Click the “TOOLS” button in Murus main window toolbar then click the “PF States Inspector” button to open the PF States Inspector window.
Click the "UPDATE ARROW" button in PF States Inspector window toolbar to display the list of currently active PF states.
NAT PF states on a Mac running Murus and acting as a dual homed router will have three different hosts: the client, the router and the server.
By default Murus shows only states with the ESTABLISHED status. It means the state is active. You can tell Murus to display all states including closing and idle states. Select the popup button in PF States Inspector window toolbar and choose “Show all connections”. You can sort PF states using the other popup button on the left.
To kill all PF states click the “Kill All States” button in the toolbar. This will close all active connections that relies on PF states.
State Inspector Info Popover
You can further inspect each PF state by double-clicking it. A new popover view will appear, showing some options for selected state.
Click the magnifier buttons to get info about selected IP address and ports. Click the GEAR button to display the Inspector Blocks popover. This is divided into 2 section:
1) right side: Blocking a connection
2) left side: Kill PF States
1) Blocking a connection
Click the ‘gear’ button in State Inspector popover. A new popover view will be displayed. On the right side,
blocking a connection is a three steps procedure:
- 1) add a block rule to Murus ruleset
- 2) restart PF to activate the new rule
- 3) kill the PF state to close current connection
There is a fourth optional step, to display the newly created block rules in Murus PF Expanded Configuration window.
In some cases you may want to disable some of these steps, according to your needs. For example you may want to issue a block rule for the future, but do not want to kill current connection, so you uncheck the “Kill selected PF state” button.
2) Kill PF States
Click the ‘gear’ button in State Inspector popover view to open the PF States Killer view. You have three button to choose from. Each buttons kills all states matching a specific pattern.
Source and destination IP are directly taken from the selected PF state, but you can edit them in this view. Every time you click one of these three buttons, the PF States Inspector main window will update. Please note that this panel is used only for closing PF states. No PF rule will be added to Murus ruleset.
The "Kill All PF States" feature is available also to Murus Lite users, from Murus "Firewall" menu in OSX menu bar.
Service Hosts Inspector
Murus is able to display currently connected hosts for each managed service, in both Managed Inbound Services and Managed Outbound Services views.
Connected remote IP addresses are taken from currently active PF states, so this list is limited to addresses involved in connections for which a PF state has been created. So if you enable static filtering for a service, connected hosts will not be visible in the Service Hosts Inspector view.
To open the Service Hosts Inspector view select a Murus Service in Managed Inbound/Outbound Services view and click the “sight” button.
You may choose to display only ESTABLISHED connections or all connections. Select an IP address and click the magnifier icon to display DNS, WHOIS and GEOIP information for that IP.
Clicking the “X” button does the following:
- INBOUND: kills all states originating from selected IP and targeting everyone
- OUTBOUND: kills all states originating from everyone and targeting selected IP
Please note that this “Kill” button will kill all selected IP’s connections, not only connections for selected service.
NAT and Port Forwarding

Murus NAT
Click the “Tools” button in Murus main window toolbar and select “Static NAT” to open the Murus NAT window. This is the place where you configure general NAT settings and where you create NAT clients outbound rules.
To properly configure Murus NAT you have to:
- 1) Select the correct WAN and LAN network interfaces (up to 3 LANs, including VLANs)
- 2) Optionally share your VPN connection with NAT clients, select the pop interface
- 3) Create NAT Groups (LANs hosts can be mixed)
- 4) Assign IP addresses and Services to NAT Groups
- 5) Optionally forward DNS queries to your default DNS
- 6) Optionally block traffic from NAT clients to WAN services (safer)
- 7) Check the “Share Internet connection” button in NAT window
WAN and LAN network interfaces
A basic dual-homed router needs at least two available network interfaces.
The WAN interface is the one connected to the Internet, usually featuring a public IP address (but it can also be a private one).
The LAN interface is the one connected to the local network. It features a private IP address and it is “seen” by other computers in your local network. These computers will use your LAN interface IP address as router address. Murus supports up to 3 different LANs, including VLANs.
Here is an example of dual-homed configuration on a computer running a public IP address:  In this example the WAN interface has a public IP address, but you can use the same configuration if your Mac is behind a NAT router and it is using private IP addresses on both LAN and WAN interfaces.
NAT Groups
The left side of NAT window shows an empty area. This is the place where all your NAT Groups are stored. Click the small “GEAR” button to add a NAT Group.
A NAT Group is a Murus object defined by an icon, a name, a list of IP and/or Network addresses and a list of Murus Services.
Choose a name for the new NAT Group then click “+” to add it. Its icon will appear in the NAT Groups view. Select its icon and click the magnifier button to open the NAT Group editing popover viewr.
Here you see two empty columns and two “GEAR” buttons. On the left side you have to add IP addresses of NAT clients. On the right side you need to add services allowed for selected NAT Group. Clients listed on this group will be able to access only these services on the Internet. All other services will be blocked. So, for example, if you want your client to be able to browse web sites you should add WEB and DNS services. To give unrestricted Internet access to your clients just add ALL SERVICES service. If you want you can activate traffic counters checking the “Set for accounting” option.
NAT Groups will show a green, yellow or red dot according to their access rights. An address may be contained in more than one NAT Group. A green dot means unrestricted access, yellow means restricted access, red means no access to the Internet.
Click “Start” in Murus main window toolbar to apply changes every time you modify NAT settings.
NAT Blocking policy
NAT clients should not be able to connect to services running on the router (the Mac running Murus NAT) unless specified by assigning specific groups to specific services in the Managed Inbound Service area.
- Traffic from NAT clients to services running on router’s WAN interface:
- Traffic from NAT client to services running on router’s LAN interfaces:
This traffic is blocked by the default Murus blocking rule. Traffic from NAT clients is allowed to any destination excluding destinations included in the "NatLanInterfaces" PF table. Murus automatically puts in this PF table all LAN interfaces set in the Murus NAT window.
Bandwidth Management
Dummynet
From 'The dummynet project' site:
Dummynet is a live network emulation tool, originally designed for testing networking protocols, and since then used for a variety of applications including bandwidth management. It simulates/enforces queue and bandwidth limitations, delays, packet losses, and multipath effects. It also implements various scheduling algorithms. dummynet can be used on the machine running the user's application, or on external boxes acting as routers or bridges.
dummynet runs within your operating system (FreeBSD, OSX, Linux, Windows) and works by intercepting selected traffic on its way through the network stack, as in the figure above, and passing packets to objects called pipes which implement a set of queues, a scheduler, and a link, all with configurable features (bandwidth, delay, loss rate, queue size, scheduling policy...).
Traffic selection is done using the ipfw firewall, which is the main user interface for dummynet. ipfw lets you select precisely the traffic and direction you want to work on, making configuration and use incredibly simple. You can create multiple pipes, send traffic to different pipes, even build cascades of pipes.
By default Apple's PF implementation uses Dummynet for traffic shaping. ALTQ cannot be used because it is not built into the OS X kernel, apparently. Dummynet is usually configured on OS X using the shell terminal commands ipfw (on OS X 10.9) or dnctl (on OS X 10.10 and up). Configuring dummynet basically means to create pipes and, optionally, queues.
Pipes and Queues
A pipe emulates a link with given bandwidth (in Kilobits per second or Megabits per second), propagation delay, number of slots and packet loss rate. Packets are queued in front of the pipe as they come out from the classifier, and then transferred to the pipe according to the pipe's parameters.
A queue is an abstraction used to implement the WF2Q+ (Worst-case Fair Weighted Fair Queueing) policy, which is an efficient variant of the WFQ policy. The queue associates a weight (1-100) and a reference pipe to each flow, and then all backlogged (i.e., with packets queued) flows linked to the same pipe share the pipe's bandwidth proportionally to their weights. Note that weights are not priorities; a flow with a lower weight is still guaranteed to get its fraction of the bandwidth even if a flow with a higher weight is permanently backlogged.
Pipes and Queues can be assigned to Murus Managed Services and NAT Groups. Each managed service (no matter if inbound or outbound) can be limited in both download and/or upload bandwidth.
Please note that bandwidth throttling for Murus Services and NAT Groups is a global setting and is applied to both inbound and outbound connections. You can also issue custom dummynet rules. Dummynet rules and custom rules are automatically assigned to anchor /murus.bw at runtime.
Manage services bandwidth
Murus offers three ways to manage bandwidth:
1) assign a pipe or a queue to managed servicea
2) assign a pipe or a queue to NAT groups
3) create custom dummynet rules
First of all you need to create a pipe (and optionally a queue). Click the METER button in Murus toolbar to display the Bandwidth Management view on the right.
Click the small GEAR button on top of this view and select "Add new dummynet pipe". A new pipe object will appear in view. Select it and click the MAGNIFIER button to open the pipe configuration popover view. Assign it a bandwidth (default is 3 MBit/s) and all needed parameters. You can create as many pipes as you want (except Murus Lite). Now you can assign this pipe to one or more services, NAT groups and/or custom rules.
To assign a pipe (or a queue) to a managed service select a service in Inbound or Outbound Managed Services and click the small METER button near the service icon to open the Bandwidth Management popover view. You can limit download and/or upload bandwidth. Click "upload bandwidth" or "download bandwidth" to display a popup menu. This menu holds all your dummynet pipes and queues. Select the pipe (or the queue) to be assigned. The same pipe can be assigned multiple times to different objects (groups, NAT groups...).
Please note that managed services bandwidth management does not distinguish between inbound and outbound, but only between download and upload. If you manage the same service in both Inbound and Outbound then the same bandwidth settings will be applied.
Please remember:
- "inbound" means "connections initiated by a remote host and targeting a local service, including traffic in both directions"
- "outbound" means "connections initiated by this Mac and targeting a remote host, including traffic in both directions"
- "download" means "traffic flowing from a remote host to this Mac"
- "upload" means "traffic flowing from this Mac to a remote host"
Pipe or Queues?
You want to use pipe to create hard bandwidth limits. All traffic assigned to the same pipe will share its bandwidth. For example you can limit HTTP/HTTPS and FTP download bandwidth creating a 1Mbit/s pipe and assigning it to the WEB and FTP services.
You want to create (at least two) queues inside a pipe in order to give different services a different weight. For example if you want to limit HTTP/HTTPS and FTP download bandwidth but granting at least 750Kbit/s to HTTP then you create a 1Mbit/s pipe and two queues, one with "weight = 75" (assigned to WEB service) and one with "weight = 25" (assigned to FTP).
Network Interfaces
Display and manage interfaces
Click the ETHERNET button in Murus toolbar to display the Network Interfaces view on the right. Each interface is represented by an icon with some indicators. Select an interface and click the MAGNIFIER button to display selected interface's info view. From this information view you can see all interface parameters and PF counters. You can also enable/disable it or ignore it. When ignoring an interface all traffic will be passed by PF. Please remember to click PLAY button in Murus toolbar to apply changes. To display a detailed table with all interfaces parameters select the small GEAR button on top of this view.
Murus Tutorials
1) Dealing with PF States
By default Murus uses PF states to pass inbound and outbound connections to local and remote services.
In this example we want to show how PF states affect networking. You should start from a Murus default configuration: select “Firewall” menu to restore Murus default configuration. We are going to set up a very simple firewall configuration, we want to allow inbound connections from a remote computer to our Mac’s VNC service (Screen sharing).
First of all we create a new group named “vnc_clients” and we add the “192.168.2.1” address: this is the IP of the remote computer in this example. Then we bind it to our Mac’s en0 interface, which is the primary ethernet interface in this example. This group will appear with a yellow dot, meaning that it is bound to an interface.
We want to allow connections from this group to our Mac’s VNC server, so we select the “Managed Inbound Services” view and then we add the VNC service dragging its icon.
Then we click the magnifier button to open the Inbound Rule popover, and we assign the “vnc_clients” group to the VNC’s “Allowed Groups” column. The service led will turn from green to yellow, meaning that its access is restricted only to a limited number of IP addresses. In our case only one IP address.
Click “PLAY” button in Murus main window toolbar to reload PF firewall rules, to activate this new ruleset.
Now we make the VNC connection. We do a real VNC connection from the remote Mac using the OS X built-in screen sharing client. Once done, keep the VNC connection open on the remote side and switch back the focus on the Mac running Murus.
Now we open the Murus PF States Inspector window to check current active connections.
.

As you can see in the screenshot above, the last state grants inbound connections from remote IP address 192.168.2.1 to our Mac’s IP address 192.168.2.2 on port 5900 (the VNC Screen Sharing port). This state has been dynamically created by PF when the remote VNC client got access to our local VNC server. The arrow displays a “left direction”, meaning that the initial connection has been made from a remote host, so it is considered an inbound connection. Despite being “inbound”, this state allows VNC traffic between these two hosts in both directions.
Now we go back to the main Murus window, in the Managed Inbound Services view. We do remove the VNC service from this view, in order to tell Murus to block it. Then we click “PLAY” in the Murus main window toolbar to reload PF rules and activate the new ruleset.
Now every attempt to connect to our running VNC server will be blocked.
But what about the existing connection? Is it blocked? Dropped? Closed? NO IT ISN’T.
Current active rules deny access to local VNC server, and this is true, but existing states are preserved, so the VNC connection is still alive. This connection has been initiated when these kind of connections were allowed. For this reason the connection will stay alive until the client and/or the server decides to close it. This is true for TCP connections. UDP states will close using timeouts.
Click “Update” button in PF States Inspector window toolbar to refresh the PF states table. You should see the VNC state is still there.
It is mandatory to understand this PF States behavior because this affects PF testing and troubleshooting. Some time it is a good practice to “Kill All States” before reloading PF rules clicking “PLAY” button, in order to test them starting from a clean PF states table. Please note that killing a state will close connections but in some cases some clients/servers applications may try to restore it immediately after.
2) PF rules order
PF rules order matters. You already know that, if you read Murus online manual. “Last matching rule wins unless a packet is matched by a rule with the quick keyword”.
In this example we show how Murus Services icons order affects the overall PF ruleset generated by Murus. Our simulated environment is the typical home network with a DSL router connected via ethernet (or wifi) to our lone Mac in a single-host network. We set up the DSL router to forward all traffic to our Mac, in order to fully expose our Mac’s network interface to the Internet. All TCP and UDP traffic from port 1 to port 65535 is redirected to our Mac. See your router documentation for more info.
Before activating this configuration you should disable all services in OS X System Preferences - Sharing prefpane. We will activate a
Now open Murus. We assume that Murus Preferences are set with default values. To restore Murus default configuration you can use at any time the Murus menu -> Firewall -> Restore Default Murus Configuration.
Select the Managed Inbound Services view and drag SYSTEM PORTS, AFP and VNC services icons from the Services Library. Delete all other services, if there is any. See screenshot below.

Click the magnifier button to configure the three services as follows:
SYSTEM PORTS: assign group “Everyone” to “Blocked Groups” and leave “Allowed Groups” empty. Click the “gear” button and deselect all options.
AFP: assign group “Everyone” to “Allowed Groups” and leave “Blocked Groups” empty. Click the “gear” button and deselect all options.
VNC: assign group “192.168-net” to “Allowed Groups” and leave “Blocked Groups” empty. Click the “gear” button and select only “log blocked connections” and “log allowed connections” options.
Now open the Murus Expanded PF Configuration window and look at the ruleset:

The rules shown in the screenshot above are generated by the Services icons you just added to the Managed Inbound Services view.
What’s the effect of this ruleset? We will see it from two points of view: filtering and logging.
Filtering
From a filtering point of view you have to consider that, by design, Murus blocks all connections except those explicitly allowed to pass. And the Managed Inbound Services view is exactly the place where you do that. So if this view is empty, no inbound connections is allowed. This very basic behavior cannot be changed.
So, we have three services in this view at the moment. Let’s look at their properties, focusing in their Ports Range:
SYSTEM PORTS: 1:1023 (it means all ports from port 1 to port 1023)
AFP: 548
VNC: 5900
You should notice that service AFP is “included” into service SYSTEM PORTS (because AFP port 548 is included in the range from 1 to 1023), while service VNC is not. This is important because rules generated by service AFP override rules generated by service SYSTEM PORTS. You can clearly see it in the screenshot above: AFP rule comes after SYSTEM PORTS rule. So if a packets matches both rules, the AFP rule will win, and will decide what to do with the packet. In this case, as it is a pass rule, it will pass all inbound AFP connections. The practical effect of this ruleset is:
SYSTEM PORTS: this icon has no filtering effect in this case, because it blocks ports that were already blocked by the default Murus filtering policy. Being the first service in list, it is not able to override rules generated by other services. So in this particular scenario this service has no effect on filtering.
AFP: this icon actually has the effect to allow connections from all remote hosts to local AFP File sharing service. This “pass” rule is not overriden by any of the forthcoming rules so is the one that wins. This is true for port 548, but not for port 88 (kerberos, needed by AFP)
VNC: this icon actually has the effect to allow connections from some remote hosts (192.168-net group) to local VNC File sharing service. This “pass” rule is not overriden by any of the forthcoming rules so is the one that wins.
Please note that VNC blocking rule overrides previous AFP rule for port 88, while VNC pass rules re-enables access to port 88 (kerberos is needed by VNC too). In this case access to port 88 is defined by the VNC service rule, not by AFP service rule, because VNC rule is the last one matching. The effect of this override is that AFP will be available only to group 192.168-net, and not to everyone. This is because AFP needs Kerberos, but our VNC rules overrides AFP rules and allows connections to port 88 only from 192.168-net group.
Now if you want to allow connections to AFP from everyone you have to add the KERBEROS service as last service and setting it to allow connections from everyone. This will allow everyone to connect to AFP, while accesso to VNC will still be limited to group 192.168-net
Logging
From the logging point of view you have to consider that:
Murus default policy for passed connections is to ignore logging, and this behavior cannot be changed.
Murus default policy for blocked connections is to log all of them, but this can be changed in Murus Preferences “General” tab.
Now we are using a ruleset with default preferences, so we assume that the option “Log all blocked connections” in Murus Prefereces - General - is correctly checked. We assume also that the “Inbound per-service block rule” is checked in Advanced tab.
So the default behavior of the ruleset in this example is to log all inbound blocked connections.
What’s the effect of the three Services icons on the PF logging system?
SYSTEM PORTS: this Service icon lacks the black pencil icon, so it means that the “log blocked connections” option is disabled. This has the effect to override the default logging policy for ports included in this service. Blocked connections to services in the 1:1023 port range will not be logged, according to this rule.
AFP: this Service icon generates only pass rules. It lacks the green pencil icon, meaning that allowed connections are not logged. This does not override the global policy because allowed connections are not logged by default. So this Service icon has no effect on logging.
VNC: this Service icon generates both pass and block rules. It has both the black pencil and the green pencil icons, meaning that both blocked and passed connections will be logged. While this does not override global blocked connections logging policy, it overrides the global passed connections logging policy.
3) Murus Logs Visualizer
In this example we want to show the logging capabilities of PF and the interaction between Murus and Murus Logs Visualizer. Our scenario is the same as previous example: a typical home network with a DSL router and a ethernet/wifi connected Mac behind router’s NAT, using a single private interface on the 192.168-net network address space. All TCP and UDP traffic is redirected from the router public interface to the Mac’s interface, which is fully exposed to the Internet.
We want to setup Murus in order to monitor remote attempts to hack into our Mac using vulnerabilities for very common network services like SSH, TELNET, MYSQL, APACHE, and such. We focus only in inbound filtering, assuming no outbound filtering is configured.
We want the logging system to be as much focused as possible on our targets, being less verbose as possible. We need to build a sort of “statistically valid” log report in order to understand what services are currently targeted by hackers and script kiddies.
What are they doing?
Before going deep into Murus configuration, we want to give you some information on how these “hackers” do to their job. Most of them simply follow a very simple and common pattern made of these steps:
1) focus on a specific service for which they have a working remote exploit
2) mass scan the Internet for hosts running such services and build a list of IP addresses
3) filter IP list selecting hosts running the specific vulnerable version of this service
4)get unauthorized root access to these host using the exploit
5) filter IP list selecting “interesting” hosts (hosts with static public IP, high bandwidth, plenty of disk space, lazy admin, the right OS, and such)
6) install a rootkit or a backdoor in order to grant an easier and more robust way to take control of hacked host over time
7) patch the vulnerable service to avoid other hackers to “steal” the hacked host.
8) steal databases or install every sort of lame software for lame activities. Hacked hosts may be used for every purpose, including being part of spam nets, bot nets and scan nets or hosting “deep web” barely legal hidden tor services. They can also be used as honeypots: hackers putting traps for other hackers with the purpose of stealing 0day tools or access to hacked shells and/or services/nets.
They do this 24/7, and they are going to do this 24/7 for the next centuries.
What are we going to do?
It is your duty to understand that running a firewall is not enough to secure a computer connected to a network. The firewall is only a part of a very complex system. Shutting down unused services, doing security updates and using good passwords, for example, are as important as correctly configuring the firewall.
Anyway the purpose of this manual is to explain how Murus and PF work, so we will focus only on this topic.
We are going to try to stop their task list at the very beginning, because we are going to block ALL connections to ALL our services. Their attempt to discover running services will simply fail, mainly for two reasons:
we are clever enough to turn off our potentially vulnerable network services, so there are no listening ports on our side.
we are going to use a firewall that blocks all inbound connections, so if we forgot to (or we can’t) close a service, access to this service will be denied by the firewall.
We assume that Murus Preferences are set as default except for the logging policy. Go to Preferences - General and uncheck the “Log all blocked connections “ option.
Look at the screenshot, this is the Managed Inbound Services view. It contains 16 icons.
We see 3 icons with the yellow led:
- BASIC SERVICES
- AFP
- DYNAMIC PORTS

connections to these services are allowed only from the LAN, because we assigned the group “192.168-net” to their “Allowed Groups”, and we left their “Blocked Groups” empty. Service AFP is set to log passed connections and to notify them with Murus Logs Visualizer.
Then we see 13 icons with a red dot. This is the interesting part.
These services has the “Everyone” group assigned to “Blocked Groups”, while we left all “Allowed Groups” empty.
Adding these icons has no effect on filtering, as you may guess, because all these services were already blocked by the Murus global blocking rule. So these icons affect only logging. While we disabled global logging on blocked packets, these services (actually only 12 services out of 13) has the black pencil icon, meaning that blocked connections will be logged, and they are also set to notify these blocks in Murus Logs Visualizer, as underlined by the black wave icon.
Click “Start” to apply this ruleset. The effect of this ruleset is:
Accept connections only from local LAN 192.168-net network to BASIC SERVICES, AFP and DYNAMIC PORTS
Block ALL inbound connections to ALL services from the Internet
Log attempts to connect to ALL system ports (from port 1 to port 1023)
Log attempts to connect to 12 local services featuring the black pencil. Some of them is already included in the 1:1023 range, but we need to add their icons in order to activate also the notification system.
Notify attempts to connect to some of these services in Murus Logs Visualizer using OS X notification system.
After some time (2-3 hours), here is an example of Murus Logs Visualizer realtime report. Look at the screenshot: on the left column you see the list of blocked ports, on the right side the list of blocked IP addresses.

We see that the most attacked port is port 23. This is the port for TELNET service. We may further investigate the activity on this port clicking a button and showing the list of remote IP addresses that tried to get into our TELNET service. Addresses are sorted by number of attempts.

Murus Logs Visualizer is able to notify inbound connections, see the screenshot below. We see that a remote IP address just tried to scan our port 22 for SSH service. The connection has been blocked.
